ALICE has an unlimited user model to allow teams to add as many users to the account as needed to effectively collaborate. Users can be added or edited individually or in bulk through a template.
🔐 User Type & Roles
To perform this action in ALICE, the user must have at least Hotel User Admin User Type access.
 Things to Consider
Usernames must be unique to the ALICE platform, not just your property. An error message will display if the username is taken.
An email is not required to create a user account in ALICE. However, it is recommended to add a work email for all users—particularly admin users—when available as some notifications can be set up to send via email.
Users with an email associated with their profile can use the “Forgot Password” link on the login screen to reset their own password.
Users without an email associated with their profile will need a Hotel User Admin or Hotel Admin to reset their password manually. Reset the password field by entering a temporary password within the user profile and sharing that with the user. The user will then be required to change their password when they login to the platform.
Configure Password Policy in ALICE prior to adding any new users to the platform.
Create “Roles” prior to adding new users. Learn more about how to Add Roles.
Jump to “Add New User - Individually”
Jump to “Add New Users - Batch”
Jump to “Edit User”
Add New User - Individually
⚙ Steps
Access ALICE Admin by selecting the user profile icon in the upper right-hand corner. Then select “Admin”.

Select “Manage Users” from the ALICE Admin menu.
Select “Add User”
Select Hotel - If you are an Admin to multiple properties, select the user’s base property. The base property is the main property that the user will log in to access.
Username - Create a unique username for the user.
Full Name - Enter the user’s full name. This will be the user’s display name in ALICE
Email - Enter the user’s email address (optional).
Photo - Select “Choose File” to add a user photo to the profile. (optional).
Password - Enter a temporary password for the user. The user will be required to change their password upon their first login to the system.
Confirm Password - Confirm the temporary password.
Position - Enter the job title/position of the user.
User Type - Select a User Type from the dropdown. Users must have either Employee, Hotel User Admin, or Hotel Admin selected.
Employee: Access to the front end of ALICE. Restricts access from ALICE Admin.
Hotel_User_Admin: Access to only User associated sections of ALICE Admin.
- Can access “Manage Users”
- Can manage Roles
- Can edit the property’s password policies
Hotel_Admin: Full Access to ALICE Admin menu.
Hotel groups in which this user is Employee - Give this user “Employee” User Type access to other properties by adding the property ALICE account name within this field.
Hotel groups in which this user is Admin - Give this user “Hotel Admin” User Type access to other properties by adding the property ALICE account name within this field.
Role - Apply existing Role templates to this user. Learn more about how to Add Roles.
Muted Facilities - In some cases, users may need access to view tickets within a Facility, but may not need to receive notifications for the tickets. Select any Facility from the dropdown to add it to the Muted Facilities field and prevent unnecessary notifications for users.
Language - Select the preferred language for this user.
Active - Enable for current staff. Disable (uncheck) for users that are no longer working at your property to prevent future access to your account.
Account Locked - Left unchecked, the user is able to access ALICE. When this box is checked, the user has attempted to log in 10 times unsuccessfully. The user must be manually unlocked to regain access. Uncheck the box to reinstate access.
Mobile Staff View Default (Check for Mine, Uncheck for All) - Controls the default ticket list view for the user on the ALICE Staff app. When checked, the ticket list will be filtered to “Mine” by default. When unchecked, the ticket list will be filtered to “All” by default.
Alert Me On Assigned Tickets - Sends a push notification to the user’s mobile device when they have been assigned a ticket.
Alert Me On Unassigned Tickets In My Facilities - Sends a push notification to the user’s mobile device when the ticket is “unassigned” if the user has been granted permissions in the associated facility.
Set “Assign to” to me - When creating tickets, the “Assigned to” field will default to the creator/this user.
Creates service requests by popout- When enabled, selecting “+ Guest Request” or “+Internal Request” will open a new popout browser window.
Using OpenTable? Add the user’s OpenTable username and special requests to leverage the integration. Learn more about using OpenTable here.
Add a work-associated phone number (optional). This number can be configured to appear on confirmation letters and itineraries drafted by this user.
Select “Save”.
Add New Users - Batch
⚙ Steps
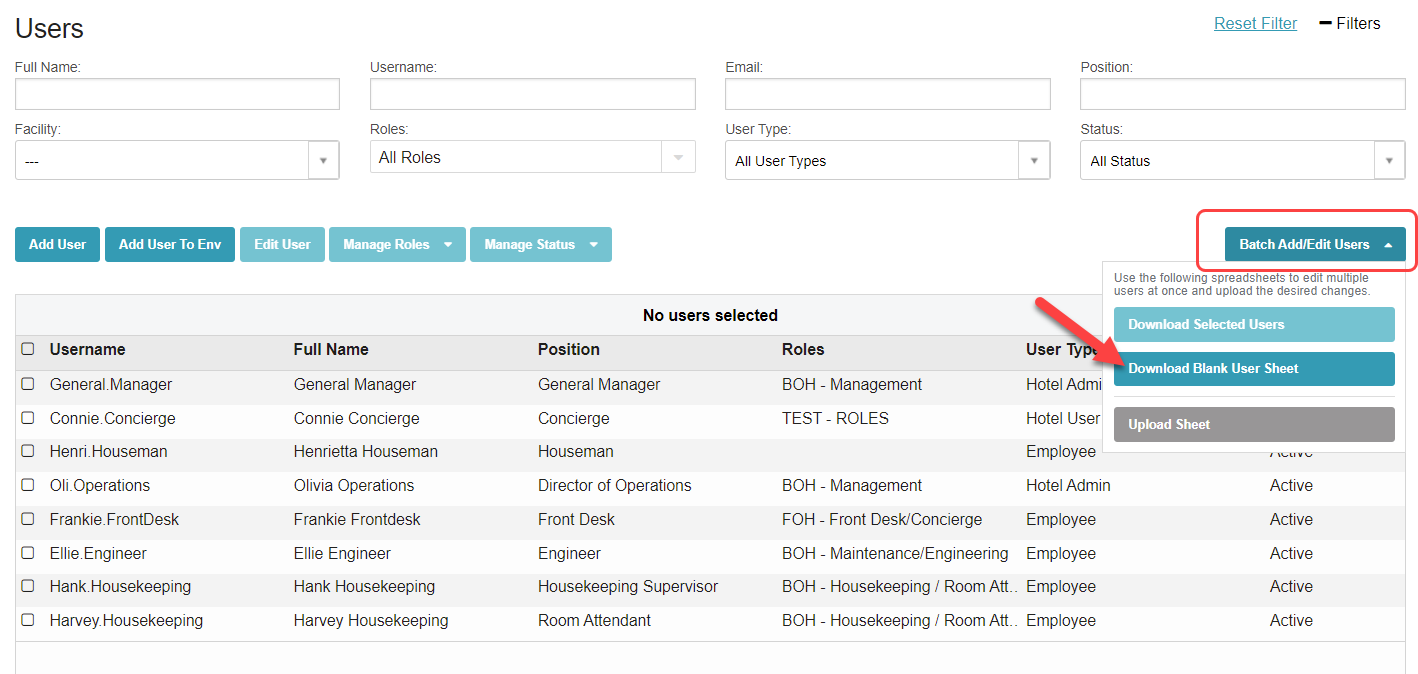
Select “Batch Add/Edit Users”, then select “Download Blank User Sheet”
Open the template. Required columns are noted with an asterisk (*) on the template. Review the column instructions defined below.
ALICE UserID (Do not modify) - This column should be left blank when adding new users from a blank user template. When selected users are downloaded onto the template, the column will auto-populate with unique ALICE User ID numbers. To avoid errors during upload, do not edit this column.Username (Required) - Create a unique username for new users. Usernames must be unique to the ALICE platform, not just your account. An error message will appear if the usernames you are trying to use are already taken. If you are unsure about whether a username is available, you can test the username in ALICE by selecting “Add User” and entering it into the “Username” field.
Password (Required) - Enter a temporary password for your users here. They will use this password when they log in for the first time. Once they log in, they will be prompted to reset their password for themselves. If using SSO, this column is still a required column. Enter any text as a placeholder.
Full Name (Required) - Add the user’s first and last name. This will be the user’s display name in ALICE.
Position (Required) - Add the user’s job title. We recommend adding the complete job title and avoiding abbreviations or shorthand.
Work Email (Optional) - Add the user’s company email address. Although this is not a required column, we encourage you to add emails so that users can reset their password, receive email notifications, or have direct email addresses listed on custom confirmation letters and itineraries.
Work Phone (Optional) - Add the user’s work telephone number to have it appear on customized templates for confirmation letters and itineraries.
Extension (Optional) - Add the user’s work extension, if applicable.
Home View on Mobile (Required) - “ALL Tickets” by default. Select “MY Tickets” or “ALL Tickets” from the dropdown. This column controls the default ticket list view for this user on the ALICE Staff app.
If “MY Tickets” is selected, the ticket list will be filtered to “Mine” by default.
If “ALL Tickets” is selected, the ticket list will be filtered to “All” by default.
Alert for Unassigned Tickets? (Required) - “Yes” by default. Select “YES” or “NO” from the dropdown. When “YES” is selected, ALICE Staff App (Mobile) users will receive a push notification to their device to alert them of a new, unassigned ticket within their department.
User Level (Required) - “Employee” by default. Select an option from the dropdown.
OpenTable User (Optional)- “NO” by default. Select “YES” or “NO” from the dropdown. If your users have an OpenTable Concierge account, select “YES”. Contact ALICE Support (support@aliceplatform.com) to enable the full integration.
OpenTable Username (Optional) - If the user has an OpenTable Concierge account and “YES” was selected in the previous column, add the user’s OpenTable username here.
SSO ID (Optional) - If using a Single Sign-On Integration, enter the SSO ID here.
Language (Optional) - “English” by default. If an alternative language is available in the account, select it from the dropdown.
Save the template sheet to the computer.
In ALICE Admin, navigate back to “Manage Users” and select “Batch Add/Edit Users”.
Select “Upload Sheet”.
Select the saved template and upload it by selecting “Open”.
When the upload is successful, the users will appear on the list view.
Troubleshooting User Upload
An error message will display if the upload template needs correction. The upload is imported to ALICE when all errors are resolved.
To resolve the errors, read the error message in full, then select “Download here” to view errors and make corrections to the template.
Errors are highlighted on the template. In the example below, the highlighted usernames are already in use and will need to be changed to unique usernames.
Make corrections to the template then save. Re-upload using the “Upload Sheet” button.
If all errors are resolved, a confirmation message will appear.
Edit Users
⚙ Steps
Select a user from the user list.
Select “Edit”.

Make changes to user fields.
Select “Update” to save.
Batch Edit Users
Select the users from the user list.
Select “Batch Add/Edit Users”.
Select “Download Selected Users”.

Use the template to make changes in bulk.
Return to ALICE Admin, then select “Batch Add/Edit Users”.
Select “Upload Sheet”.
Changes will be pushed to user profiles when successful.
Learn more about Troubleshooting User Uploads.